Snow crystal growth patterns
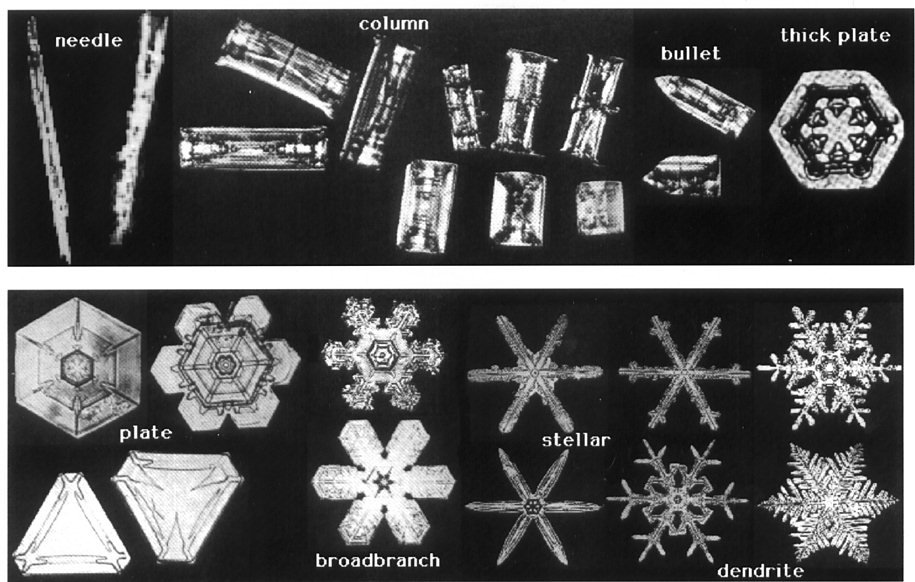
There are many shapes of snow crystals. [Illustrations on the
overhead or computer projector] Most likely you are familiar with these
that have six branches and branches on the branches. [lower right
of illustration] We call them dendrites. There are also some crystals
that have only the main six branches and nothing on their sides. We call them
stellars, which means star-shaped. Those branches can be broad. They can be
stubby. Maybe there are no branches at all, and we have a simple hexagonal
plate. [moving progressively to the lower left; then move to the
upper right]
Those plates could be thick. If they are thicker still, we could turn them on
their side and see a rectangular shape. We call them columns. They can be long.
If they are very long and narrow we call them needles. [moving
progressively to the upper left] If they have pointed ends we call them
bullets. Those are the basic snow crystal shapes. There are many combinations
of them.
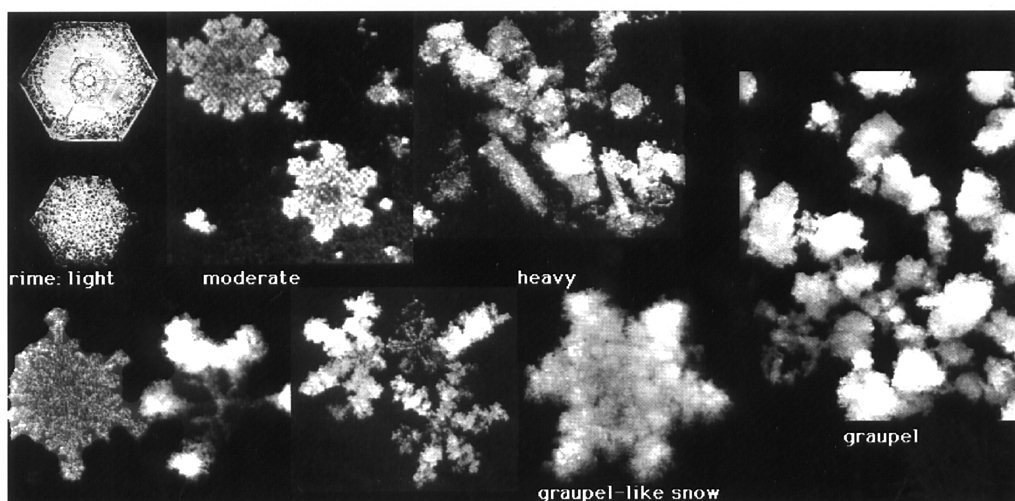
There is another way in which snow crystals can grow. If they are big enough
they may hit water droplets before those droplets have a chance to evaporate.
[refer to the upper left of the illustration] If so, then
the water droplets will freeze instantly to the surface of the ice crystal,
building up a white deposit that we call "rime". That rime may nearly obscure
the crystal inside. [refer to the lower center] If it does
so, then we have a snow pellet composed almost entirely of frozen water droplets.
We call it "graupel". [refer to the right] Most likely you
have seen this type of snow in the Autumn and Spring. It tends to bounce on
the sidewalk during certain snow showers. If the process of riming continues
and some clear ice layers are added, then we get hail.
So how do we get the various shapes of snow crystals? This is a diagram that I
memorized in high school. It was not taught there; I learned it at home. Along
the bottom axis is a temperature scale ranging from -40 to melting. We scientists
like to use the Celcius temperature scale, and in this case it helps when
memorizing the diagram. The vertical axis indicates moisture, from dry cloud
to wet cloud.
We see that the pretty, highly branched dendrites grow only at -15C, give or
take a couple of degrees. Beside them are the broadbranched crystals, then the
hexagonal plates. The columns are near -9 and -20C. Needles are only at -5C.
Bullets are colder than -20C. So temperature controls most of the snow crystal
shape.
With that diagram in mind we can figure out the combinations of shapes. For
example, if a crystal starts growing at -18C, then it will have a hexagon in
its center. [bottom] If it continues to grow at -15C, then
on the tips of the hexagon there will be branches. If the crystal starts at
-15C, it will be a dendrite. If that crystal continues to grow to -12, then on
the tips of the branches there will be hexagons. There are many other combinations
of temperatures and shapes.
So in the wintertime you could have fun by looking closely at the snow crystals
falling on your sleeve. Look at the design changes from the center to the edge.
Then you can tell the temperatures in the clouds where the crystals are growing.
You don't even have to go up into the cloud and measure the temperature there;
the crystal shapes tell you what the temperatures are. I had fun doing this in
high school, and I still do it.
[Back to the freezer for a repeat of the instant snowstorm with
another group of students.]
Back, Next
Home,
sequence,
equipment,
clouds,
vapor growth,
snowstorm,
cloud seeding history,
related topics,
water optics,
ice optics,
trouble shooting